Pages

Sunday, November 29, 2015

CDD Christmas Linky Party - Merry Christmas


Hello and Happy Monday! 


Today is the start of a new Linky Party! The Theme is Make it Sparkle. Every other Monday will mark the beginning of a new semi-weekly Linky Party over at the Craftin Desert Diva's blog. I hope you will play along with us and share your projects with the Make it Sparkle theme! Every Linky Party will have a winner and a Top 3 so you have a chance to win a prize! The more times you join us, the better your chances!

Our Sponsors Are:


Here is my project:


To start, I die cut a scrap of My Mind's Eye Shimmer Cardstock in Imperial Red with the largest scallop die from the Stitched in Circles Dies set. Next, I used the wreath die from that set to die cut vellum and white paper and adhered them to the red paper using Multi Medium Matte.


After that, I clear heat embossed the bottom half of the birdhouse and blended Ground Espresso Distress Ink into the paper, fussy cut the Home Sweet Home sign on the birdhouse and set it aside.

Next, I second generation stamped the bird house and the bird with Rich Cocoa Memento Ink and colored the images with various Copic markers. Using my craft knife, I cut the holes out of the birdhouse. 


After I was done, I fussy cut the images, used foam tape to mount the sign on the birdhouse and made the bird look like he was perching on the sign.


For the card base, I started by blending Festive Berries Distress Ink into the bottom of the card and fading it upwards. When the Distress Ink was dry, I heat embossed the sentiment, Merry Christmas, from the stamp set, Tis The Season, using white embossing powder from Hero Arts.


For the finishing touches, I adhered a scrap of tinsel ribbon around the card base and popped the scalloped circle up with foam tape over the ribbon. I brushed Clear Wink of Stella over parts of the images and used a red Wink of Stella glitter pen to draw sparkly red dash lines all the way around the card and I was done!


CDD Products Used:


Thank you for stopping by and have a beautiful day!


Sending tons of... Heartfelt Thanks!


Hello and Happy Sunday!

Today I am showcasing the new mini stamp set, Tons, and two die sets, Stitched in Circles Dies and Stitched Scallop Dies. When I saw this little elephant, I thought it would be fun to make it look like he (or she) was leaning out of the circle. 

This stamp reminds me of a pink stuffed animal that I had when I was little so of course I had to color the elephant pink! haha 


To start, I colored the images with various copic markers and stamped the tiny hearts from the stamp set several times. I ended up using three small hearts above the elephant's trunk. I die cut the circles with the Stitched in Circles Dies and Die cut the hearts panel with one of the Stitched Scallop Dies

I created the background blending Picked Raspberry Distress Ink out from behind the circles into the top of the card and lightly blending Picked Raspberry behind the hearts panel. The larger hearts are from the Chilly stamp set, stamped with Ultra Pink and Soft Pink inks from Hero Arts.


I used the sentiment, "Sending TONS of" on the front of the panel and inside the card it says, Heartfelt Thanks.


The sequins are from the sets, Hocus Pocus and StarPower. To finish the card, I brushed Clear Wink of Stella over the elephant's ears and over the tiny hearts. After covering the tiny hearts with Glossy Accents, I was done.


CDD Products used:


 Thank you for stopping by and have a beautiful day!


Tuesday, November 24, 2015

CDD November Product Release


I'm so sorry but due to circumstances I will post my project at a later time.

Here's your letter code: A

Your next stop is Steph

Thank you and enjoy the rest of the hop.


Sunday, November 8, 2015

CDD Make it Sparkle Linky Party - Hope Your Holiday Sparkles!


Hello and Happy Monday!


Today is the start of a new Linky Party! The Theme is Make it Sparkle. Every other Monday will mark the beginning of a new semi-weekly Linky Party over at the Craftin Desert Diva's blog. I hope you will play along with us and share your projects with the Make it Sparkle theme! Every Linky Party will have a winner and a Top 3 so you have a chance to win a prize! The more times you join us, the better your chances!

Our Sponsors Are:


Here is my project:


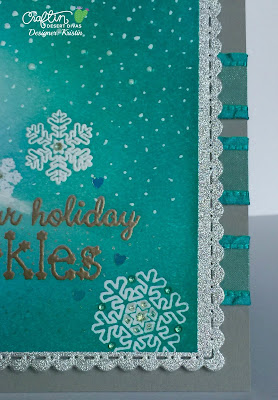
I used the stamp sets, Chilly and 'Tis The Season and the Fancy Frame Dies for this card. 

Originally, I had planned to make this card a shaker but couldn't bring myself to cover it all up with acetate. 

To start, I stamped the sentiment, Hope your holiday sparkles, with Versamark Ink. I sprinkled Liquid Platinum embossing powder from Ranger, tapped off the excess and melted it with my heat tool. 


Next, I stamped snowflakes from the Chilly stamp set with Versamark Ink and sprinkled white embossing powder from Ranger. 

After I was happy with the arrangement of snowflakes around the sentiment, I decided to stamp the bear with second generation stamping using Rich Cocoa Memento Ink. I covered the bear with a 2mm Molotow masking pen and when that was dry, began working on my background.

I used the colors Peacock Feathers, Tumbled Glass and Cracked Pistachio to blend into the background, using a light hand in the center around the masked bear. 


After I gently removed the masking fluid, I didn't want the bear to look like he was floating so I decided to mask him again with a post it note. I used Unicorn White Ink from Hero Arts and a sponge dauber to make a snowy hill on which the bear could stand. There wasn't enough dimension for me so I took my Copic Opaque White and built it up around the bears feet as well.


Next, I colored the bear with various Copic markers. I wasn't entirely happy with the bear's head so I decided to stamp the hat that comes in the Chilly stamp set with the same Rich Cocoa second generation stamping. I also colored the hat with Copics and fussy cut it out, using Tombo Mono Multi glue to adhere it onto the bear. I did not use Tombo Mono on the strings for the hat.

To make this a snowy scene, I used a Uniball Signo Broad White gel pen to make it look like snow was falling, including over the bear and the hat. 

For the heat embossed snowflakes, I used a Sakura Stardust Glitter Pen to make dots of sparkle around the snowflakes and in the center. To accentuate the sparkle, I used high, small dots of Glossy Accents. I also used tiny dots of Glossy Accents on the bears eyes and nose.


Using the Fancy Frame Dies, I die cut some silver glitter cardstock with the largest die in the set and adhered the two panels together with Tombo Extreme Adhesive.

For the card base, I used Smoke cardstock and wrapped some pretty ribbon around it before I adhered my panel with Scotch Foam tape. Or as Sandy Allnock calls it, The Precious. haha


Going along with the theme of, Make it Sparkle, I brushed Clear Wink of Stella over the snow where the bear is standing and over the sentiment. I would not suggest using the Wink of Stella over the white gel pen or Copic Opaque White. I learned that the Wink of Stella will start to pick up and move around the white, making lovely clumps of sparkle.


To show the dimension of the Glossy Accents and the snow, I took a picture underneath my lamp that I use to color. I have decided that I need to put things down at night and look at them again in the morning. I was convinced that I ruined my card with the Glossy Accents but it turned nicely in the daylight.


CDD Products Used:


I hope that our cards have inspired you to play along with this Linky Party!

Thank you for stopping by and have a beautiful day!