Pages

Wednesday, September 30, 2015

Seasons Greetings!


Hello and Happy Wednesday! 

I realize that it isn't October yet and I've posted a Christmas card on IG and now on my blog but I felt inspired. Even more so because it's an image I colored back in mid June for Kathy Racoosin's 30 Day Coloring Challenge!

In my quest for images to color for the challenge, I was perusing The East Wind on Etsy and found this beautiful image called, Aurora Reindeer. It was a joy to color and surprisingly didn't take me that long. I will happily admit I am a slow crafter. 

To start, I colored the image with Copic markers and added Clear Wink of Stella to the trees in the background and around the fuzzy parts of her coat. I also added white dots over the top of the image to look like snow using a Uniball Signo Broad White Gel Pen.


When I was finished coloring, I used a large circle die and set it aside for three months simply because I wanted to make this card when I wasn't rushed and I could make a card I like. 


When I sat down to finish this card, I wanted the image to stand out but wasn't quite sure how to proceed with the card. It's ok to step back and ask a friend their opinion once in a while. My sweet friend Giorgia makes such wonderful cards and I mentioned to her that I was almost intimidated to make a card with this image. Sometimes I am so pleased with my coloring that I put it aside until I have a good idea on how to make a card that won't ruin my coloring. She suggested that I keep the card simple. Only the image and a sentiment. After that, the ideas came easier. Clean and simple isn't exactly my style! haha

I started by creating a square card base which measures 5" x 5" With Neenah Solar White 110 lb cardstock. I decided on a sentiment from Simon Says Stamp that says, "Seasons Greetings," and comes from the stamp set, Be Joyful


I cut a 3 inch scrap piece of paper and heat embossed the sentiment using Versamark and Ranger Liquid Platinum embossing powder. I finished the sentiment by using my scissors to cut both ends to make it look like a banner. 

For the background, I decided to use the Falling Snow Stencil from Simon Says Stamp and White Embossing Paste from Wendy Vecchi. 


To add a little more sparkle and define the circle against the background, I used a Sakura Stardust Glitter Pen and drew a thick line around the edge of the die cut circle. 

I added dimension by adding foam tape to the back of the circle and on the back of the sentiment and the card was finished.


Thank you for stopping by to see how I finished this card! I will be back on Friday with a card for the CDD Blog Hop!

Have a beautiful day!

Kristin

Tuesday, September 29, 2015

Happy Hallo-scream!


Hello and Happy Tuesday! 

The last four days have been full of sneak peeks of the new release at Craftin Desert Divas on Facebook. For my sneak peek, I used the Frankenstein from the new stamp set, Hallo-scream. 

To start, I stamped the images I knew I was going to use on this card and colored them with Copic Markers. I wanted to color Frankenstein's face to look like he had painted his face green for trick-or-treating and fussy cut all of the images when I was finished coloring.


For the skull and the headstone, I did a tiny bit of masking to have the skull sit in front and make it easier to cut out later. I colored the skull to make it look like its eyes are glowing and the same for the pumpkin.


For the sentiment, I used the smallest die from the Fancy Frame Dies set and cut it out of Neenah Solar White 80 lb and stamped the sentiment with Versafine Onyx Black.


For the background, I knew I wanted to create a watercolor background so I pulled out my Strathmore 140 lb watercolor cardstock and my Distress Inks. I ended up using four colors of Distress ink; Spiced Marmalade, Seedless Preserves, Dusty Concord and Black Soot. First, I smooshed the Mini Distress Inks onto my craft mat, spritzed water once over the ink and laid my cardstock panel over the ink and moved it around slightly. Next, I dried the panel with my heat gun and continued to pick up ink with my panel. When I achieved the look I was going for, I dried it with my heat gun and used the largest die in the Fancy Frame Dies set to cut a scalloped panel.


After I die cut the panel, I blended Black Soot into the lower portion and pulled out some Gouache in a light green, dark green and brown and mixed the colors until I had the color I was looking for for the ground. I decided to make a higher hill with the gouache so I could die cut some vellum with the same die from the Fancy Frame Dies and cut the top of the vellum by hand to make it look like fog on the ground. I also drew the clouds with a permanent sharpie pen, fussy cut the clouds by hand and colored the backs of the vellum with Copics to make them look dark and stormy.

After I had finished the layers of the background, the fog and the clouds, I put the rest of the card together and added a few sequins from the new release called, Hocus Pocus and added Clear Wink of Stella to several areas of the card. 


To add a finishing touch, I used a gold gel pen to draw dash lines all along the outside of the black panel on which I adhered my scene. To complete the card, I adhered it all to a black top fold card base and my card was finished!


Other CDD products used:


I hope you liked my sneak peek! Thank you for visiting and don't forget to visit my blog on Oct 1st for the CDD Blog Hop for another sneak peek from the new release! 

Have a beautiful day!


Wednesday, September 23, 2015

Monster-ous Birthday Wishes!


Hello and Happy Wednesday! 


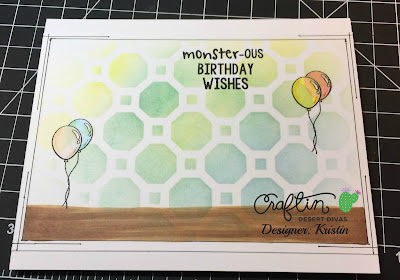
I have a fun card to share with you today. I had the idea to blindfold the one eyed monster and make this card a, "Pin the Tail on the Pig," Monster birthday party!

To begin, I taped down a handmade stencil over a 5x7 panel of Neenah Solar White and lightly blended three Distress inks into the background; Cracked Pistachio, Squeezed Lemonade and Tumbled Glass.

Next, I used a ruler and a 0.3 Copic Multiliner to draw lines to frame my stenciled area. I thought it would be fun to stamp the balloons directly onto the background and color them so they look translucent. 


Once I saw how well the balloons turned out, I thought I would do the same thing but on a separate piece of paper and fussy cut the balloons when I was finished coloring. Isn't it nice when you try something new and it turns out exactly like you wanted? 


I colored the monsters with Copic markers. The expression on the red monster's face could be interpreted a number of ways so I decided to make it look like she was floating away. The monster on the right makes me laugh. It looks like he drank too much punch at the party.

The balloons are from It's All About Zoo and the presents are from Owl-idays

With my blindfolded monster, I decided to try to come up with a Pin the Tail on the ___ game. I drew the pig I used to doodle and drew him facing away. Instead of drawing the tail directly on the pig, I drew it with a Copic Multiliner onto a scrap piece of paper, loosely cut around the tail and popped it up with clear foam tape so it looks like the monster pinned the tail on the pig.


For the sentiment, I decided to go with, "Monster-ous Birthday Wishes," and stamped it with Versafine Onyx Black so the sentiment would be bold.


After I Copic colored the monsters, I fussy cut the presents, colored them and assembled the card. I added glossy accents the monsters eyes and Clear Wink of Stella to the balloons and the ribbon on the presents.


Here are the products I used:


Thanks for visiting and have a beautiful day! 


Sunday, September 20, 2015

Favorite Color Combo Linky Party "Smile"


Hello and Happy Monday! 

Today is my first post as a design team member for Craftin Desert Divas (CDD)! I'm looking forward to working with this group of kind, talented ladies!

Every other Monday will mark the beginning of a new semi-weekly Linky Party over at the Craftin Desert Diva's blog. I hope you will play along with us and share your projects! Every Linky party will have a winner and a Top 3 so you have a chance to win a prize! The more times you join us, the better your chances! 

Our Sponsors are:


The theme for this week is Favorite Color Combo and I think this is a fun theme! I had to choose between my favorite colors and I decided to make a fun, watercolor background with Distress Inks. Those who are familiar with Distress Inks know their favorite color combos so picking colors for my background was stress free!

Here is my project:


I used two adorable mini Stamp Sets for my card: Wish Upon A Star and Wanna Hug

To begin, I die cut a scalloped panel with watercolor cardstock from the die set, Fancy Frame Dies. I just have to say, I love the stitching on these dies and all of my stitched dies but this die set adds a little something different from the others. 


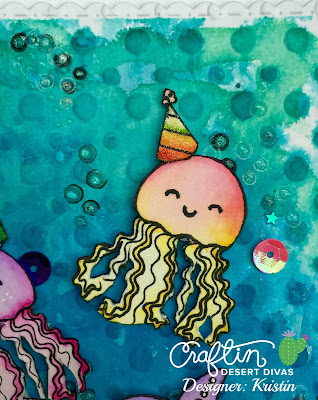
Next, I ran the panel through my Big Shot with a Darice embossing folder to make a fun, textured background. In order to make the dots from the embossing folder stand out more, I smushed the distress ink onto an acrylic block, spritzed it with a bit of water and ran it over the textured background to let the ink soak into the raised dots. Then I smushed the four different inks onto an acrylic block and picked up the color with a paint brush to blend color into the rest of the background. My new favorite Distress Inks to blend together for this type of background are Cracked Pistachio, Tumbled Glass, Salty Ocean and Dusty Concord. 

For the sea creatures, I decided to stamp them on watercolor cardstock and color them with my Zig Clean Color Real Brush Markers. There does seem to be a learning curve with these markers. They bleed into each other like crazy if you aren't careful. Even after they're dry, they can be reactivated with water. First hand experience taught me that even carefully brushing Wink of Stella over the dry ink on the hat on the left jelly blended the purple, blue and green together. To fix this, I drew white gel pen lines and dots on the hat. I had to leave my artistic control side at the door and just go with it this time. haha it also helps to use less markers. It's amazing the varied color you can achieve with just a couple of markers. Thankfully, I love the way they turned out.


When I was finished coloring the jellies and starfish, I decided to stamp some of the bubbles from the Wanna Hug stamp set. First with Stazon, then with Unicorn White from Hero Arts. I brushed Clear Wink of Stella inside each of the bubbles and then added Glossy Accents inside each of the bubbles and also little dots around the background.


For the sentiment, I wanted to use the Smile stamp from the stamp set, Simply Said. I needed to come up with a strip of paper to stamp it on so I decided it would be fun to use one of the banner stamps that comes in the stamp set, Short & Sweet Tags. I stamped the banner, fussy cut around the dash lines and stamped Smile with Tutti Fruity ink from Mama Elephant. 


The only thing left to do was adhere some sequins to enhance the feel of the underwater party! I used StarPower Sequins and Dream Catcher Sequins. Aren't they fun? I love the tiny stars! 


Thank you for visiting and have a beautiful day! 

Kristin 


Products Used:


Saturday, September 19, 2015

Wish BIG!


Hello and Happy Saturday!

Today I am sharing another birthday card using the adorable Penny Black stamp set called, Sunny Days. My inspiration came in the form of a photo taken by the recipient of this card, fishing in photos and mentioning that she was enjoying some quiet time. What could be more relaxing on your birthday than sitting by the water, enjoying the sun and fresh air? 

To begin, I stamped the dog fishing on Neenah Solar White 80 lb card stock with Memento Tuxedo Black ink. I actually thought about trying no-line coloring with this card but then I located my sanity and stamped normally. However, I did free hand the background with Copics. Can you imagine trying no-line coloring with this image? Craziness. Haha


For the dog, I wanted to color him black but I have yet to color an animal 100% black so I chose greys. Usually I have the most difficult time deciding how to color animals and flowers. Especially black hair/fur because it's intimidating to me. I suppose this means I need more practice! I decided to try coloring a dog with spots and this happened! Don't you just love surprises? 


I have been trying to color my light source from different directions but coloring the shadow in front of the basket made me kick myself. I thought that was far too ambitious for this coloring adventure. Considering I had no idea what I was doing, I think it turned out ok. For the water, I used four different Copic colors and plenty of colorless blender. 


I've only been fishing a few times in my life and besides catching boots, crawdads and other surprising objects, I have only caught rainbow trout. I couldn't remember what they looked like so I did what I always do in that case and googled images of rainbow trout. I don't have a large selection of Copics so I just did the best I could with the colors at hand. To make the fish look like it had just been pulled out of the water, I brushed clear Wink of Stella over the fish. For the water droplets and some waves on the water, I used a blue Wink of Stella glitter marker. The bugs flying above the dog and fish are from another stamp set; Avery Elle, Happy Camper, also with a light brushing of Clear Wink of Stella.


For the Wish Big, I used a small sentiment from a Craftin Desert Divas stamp set called, Short & Sweet Tags. I stamped the sentiment with Versafine and clear embossed to make it shiny and raised. For the clouds, I used a sponge dauber and Unicorn Pigment Ink from Hero Arts. I also used Fog from Simon Says Stamp to darken the bottom of the clouds. 

That pretty much sums up this card. Thank you for visiting and I will attach a few more photos below.

Have a beautiful day!

Kristin